Core Concepts
Areious Task organizes work in a simple hierarchy. Understanding it makes the rest of the app easy to follow.
Workspace → Project → Board → Task
- Workspace: your company's home in Areious Task, the top level that holds all of your projects and boards.
- Project: a container for related boards, with its own members and Project Admins. A board always lives inside a project, so a project is created first.
- Board: where work actually happens. It holds the tasks and defines their statuses, columns, and fields. Board membership controls who can see and work on it.
- Task: a single piece of work. A task is either a Feature (stands on its own) or a Sub-task (belongs under a parent feature).
The workspace home is where you land after signing in. It shows the boards you belong to as cards. Select one to start working in it. The list is membership-driven, so you only see boards you have been added to. A Global Admin who needs the full list of every project and board across the company will find it under Settings → Projects & Boards.
Roles
Every account has one of three roles, which set what a person can do across the company:
- User General access to the boards they belong to: creating and working on tasks, logging time, and collaborating.
- Project Admin Full control of their own projects: adding boards, appointing co-admins, and managing board options and members. Also has access to Users and Reports.
- Global Admin Full access across the company: every project and board, App Settings, Billing, Retention, and the Recycle Bin.
Access is also scoped by membership: someone can be a member of a project, a co-admin of a project, or a member of an individual board. Throughout this guide, each section is tagged with the role needed to perform it.
Installation
Areious Task is a self-hosted, server-rendered application: plain PHP 8.1+, a MySQL/MariaDB database, and a vanilla-JavaScript front end. No build step is required.
Requirements
- PHP 8.1 or newer with PDO enabled
- MySQL or MariaDB (
utf8mb4) - Apache with
mod_rewriteandmod_headers(a.htaccessfile is included) - No Composer, Node, or build tooling. The release package is ready to run and already includes its bundled
vendor/folder (HTMLPurifier).
Steps
- Create a database and a database user with access to it. We suggest naming the database
taskso it's easy to identify. Keep the database name, username, and password handy, because you'll enter them in a later step. - In your website's public folder (often called
public_htmlorwww), create a folder namedtaskand upload the Areious release package (a.zipfile) into that folder. Extract it there, so the package's files sit directly insidetask(you should seeindex.php,config.example.php, and thevendor/folder intask, not in a nested sub-folder). Once extraction is complete, delete the.zipfile from the server so it isn't left publicly downloadable. Areious Task will then be reached athttps://yourcompany.com/task. The package already includes the bundledvendor/folder (HTMLPurifier), so there is no Composer or build step. Just make sure the whole package,vendor/included, ends up inside thetaskfolder. - Copy
config.example.phptoconfig.php. Areious Task reads its settings fromconfig.php. The package ships only the templateconfig.example.php, so make your own copy of it and name the copyconfig.php. (The template stays as-is, so a future update never overwrites your settings.) Do one of the following:- Either: on the command line, run
cp config.example.php config.php - Or: in your host's file manager, copy
config.example.php, then rename the copy toconfig.php.
- Either: on the command line, run
- Add your database details. Create a plain-text file named
.envin the same folder asconfig.php(yourtaskfolder), with one setting per line.config.phpreads this automatically, which keeps your database password out of the main config file:
Use the database name, user, and password you created in the previous step. (DB_HOST=localhost DB_NAME=task DB_USER=your_db_user DB_PASS=your_db_passwordDB_HOSTis almost alwayslocalhost.) - Set your site details. Open
config.phpin a text editor and edit these two lines near the top:define('SITE_URL', 'https://example.com/task'); define('SITE_NAME', 'Company Name');SITE_URL: the full web address where Areious Task lives, with no trailing slash. Example:https://yourcompany.com/taskSITE_NAME: the name shown in the browser tab and header, such as your company name

The two site-detail lines in config.php. Replace the example values inside the quotes with your own. - Attachments (nothing to set up). Files that people attach to tasks are stored in the database, alongside the rest of your data. There is no uploads folder to create or make writable, and attachments are served through the app (so a person only sees an attachment if they're allowed to see its task) and travel with the database if you ever move or replace it. Attachments are limited to 10 MB each; for larger files, use a task's Links tab to reference the file in SharePoint, OneDrive, or a shared drive instead.
- Open the site in your browser. Go to the address from step 5 (for example
https://yourcompany.com/task).- On typical shared hosting (cPanel, Plesk, and most managed hosts), there is nothing extra to configure. Apache already serves your
public_htmlfolder and already honors.htaccess, so the address just works. - On a server you manage yourself (a VPS or a custom Apache setup), make sure Apache is set to read the
.htaccessfile that ships with Areious Task. In other words, the directory'sAllowOverrideshould be set toAll, notNone. Without it, Areious Task's page addresses (its routing) won't work. If you see the home page but every other link gives a "404 Not Found", this is almost always the cause.
- On typical shared hosting (cPanel, Plesk, and most managed hosts), there is nothing extra to configure. Apache already serves your
- Complete the initial setup screen. The first account you create becomes the Global Admin; later self-registered accounts are created as standard Users.
Scheduled tasks (optional)
Reminders, recurring tasks, and queued notification emails run automatically from normal traffic. An inline backstop is on by default, so Areious Task needs no cron to work. This step is only worth setting up if you want time-sensitive items to go out punctually even during quiet periods when no one is signed in.
What is cron? Cron is a built-in scheduler on Linux web servers that runs a chosen command on a repeating timetable, such as once a minute. The list of scheduled commands is called the crontab. Most shared hosts expose it through a "Cron Jobs" tool in their control panel (cPanel and Plesk both have one); on a server you manage yourself, you edit it by running crontab -e. If you have never used it, that control-panel tool is the easier route, and your host's documentation will show where to paste the line below.
To set it up, first choose a secret value and set it as TASK_CRON_TOKEN in your .env file (this password stops strangers from triggering the job). Then add this single line to your crontab, replacing example.com with your own address and YOUR_TOKEN with the secret you just chose:
* * * * * curl -fsS "https://example.com/task/cron.php?token=YOUR_TOKEN" >/dev/null 2>&1The five stars at the start mean "run every minute." The rest quietly asks Areious Task's cron.php page to do any due work, discarding the output. That is all there is to it. You don't need to understand the individual pieces to use it.
App Settings
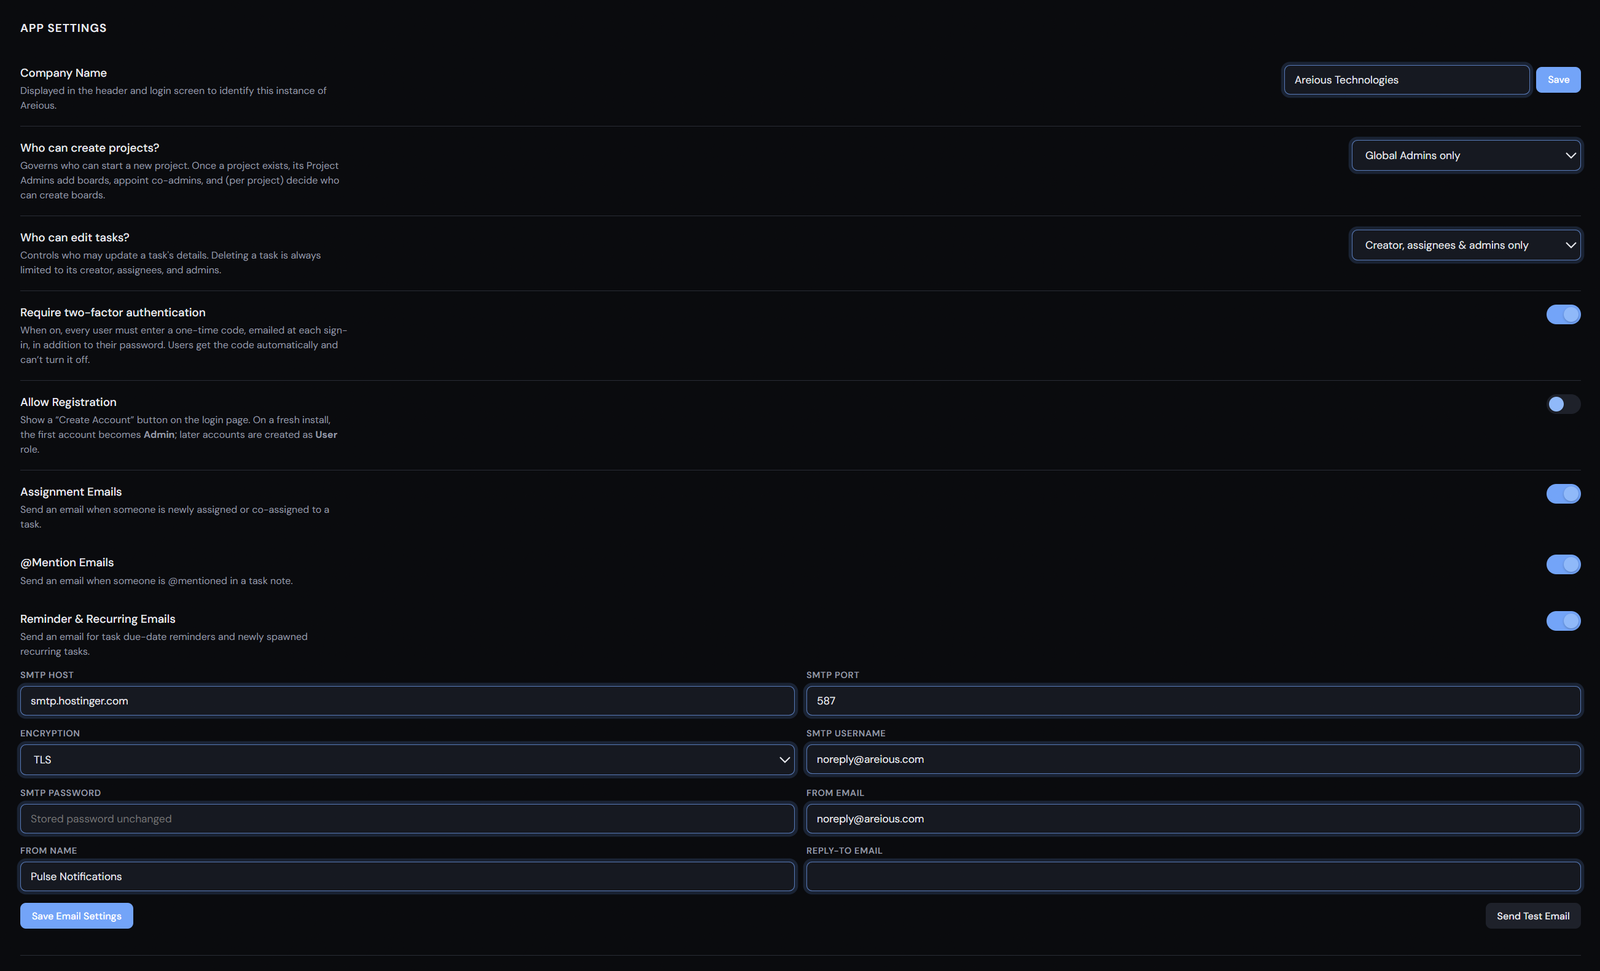
- Set the customer name shown in the header and on the login screen.
- Turn public registration on or off. On a fresh install the first account becomes Global Admin; later self-registered accounts are created as Users.
- Choose Who can create projects? Set it to Project Admins & Global Admins or All users.
- Choose Who can edit tasks? Set it to Creator, assignees & admins only or All users can edit (deleting a task always stays limited to its creator, assignees, and admins).
- Turn email notifications on or off independently: Assignment (newly assigned or co-assigned), @Mention (mentioned in a task note), and Reminder & Recurring (due-date reminders and newly spawned recurring tasks).
- Turn Due-Date Reminders on or off. When on (the default), every task with a due date automatically reminds its people the morning before and again the morning of, with no per-task setup. See Task reminders for how they work.
- Turn Require two-factor authentication on to make every user confirm each sign-in with a second factor, their authenticator app if they set one up, otherwise an emailed code (see Two-Factor Authentication).
- Manage SMTP host, port, encryption, username, password, sender, and reply-to settings.
- Send a test email to confirm notification settings.
Knowledge article: SMTP email setup →
SMTP Email Setup
Areious Task sends notification emails through your own SMTP mail server, configured in App Settings. Finding your SMTP host, port, encryption, and credentials works the same across Areious products.
Single Sign-On (SSO)
Single Sign-On lets your team sign in to Areious Task with your existing identity provider, such as Microsoft Entra ID, Okta, Google Workspace, or Auth0, instead of a separate password. It uses the OpenID Connect (OIDC) standard and runs alongside normal password sign-in.
Setup is the same across Areious products, so the full step-by-step guide, including how to register the app at your provider, add it in App Settings, match and auto-create accounts, and troubleshoot sign-in, lives in the shared Knowledge Center.
Troubleshooting
Site shows a blank page or a 500 error
- Confirm
config.phpexists and was copied fromconfig.example.php. - Confirm the database credentials are correct and the database user has access to the configured database.
- Confirm the PHP version is 8.1 or newer.
- Confirm the release package was uploaded complete, so the
vendor/directory (HTMLPurifier) is present.
Can't sign in
- Confirm the email and password are correct. Password fields are case-sensitive.
- Repeated failed attempts trigger a short login lockout. Wait a few minutes and try again.
- Ask a Global Admin to confirm the account is active. Deactivated accounts cannot sign in.
Sign-in takes a second or two
- With two-factor authentication on, each sign-in sends a one-time code by email, and on some hosts sign-in waits for that email to go out. See Sign-in speed and your host's PHP setup for why, and how to make it faster.
You were signed out unexpectedly
- For security, Areious Task ends a session after a long period without activity. Just before that, a “Still there?” prompt appears with a countdown. Choose Stay signed in to keep working.
- If you see “Your session expired” after a screen was left open for a while, the session simply timed out. Sign in again and pick up where you left off; anything you had already saved is safe. See Signing In for how the timeout works.
A task looks locked or can't be edited
- A 🔒 badge means the task is blocked by a dependency. Open the task's Dependencies tab to see what is blocking it.
- By default, only a task's creator, its assignees and co-assignees, and admins can edit it. If someone needs broader access, a Global Admin can change Who can edit tasks? in App Settings to All users can edit, letting any board member edit tasks. Deleting a task always stays limited to its creator, assignees, and admins.
- Otherwise, ask a Project Admin or Global Admin to make the change, or to update the assignment.
Notification emails aren't arriving
- Check spam or quarantine folders first, especially for the first notification sent.
- Ask a Global Admin to review the SMTP configuration in App Settings and send a test email.
- Some providers require an app password or explicit SMTP authorization for external applications. See the SMTP email setup guide.
An attachment won't upload
- Attachments must be 10 MB or smaller, in a common PDF, Office, text, CSV, or image format. For a larger file, add it on the task's Links tab instead.
- Attachments are stored in the database, so an upload failure usually points to the database, check that it is reachable and that the MySQL
max_allowed_packetsetting is large enough for the file (at least a few MB).
The interface looks out of date after an update
- Do a hard refresh (Ctrl/Cmd + Shift + R) to clear cached styles and scripts.
Projects & Boards
Because a board always lives inside a project, setting up a workspace starts with a project. From the workspace home, use + New Project & Board to create both at once, or + New Board to add a board to a project that already exists.
Create a project and board
- On the workspace home, select + New Project & Board.
- Name the project and the first board inside it.
- Create it. The new board opens, ready for its statuses, fields, and members to be set up under Board Settings.
Who can create projects and boards
- A Global Admin sets Who can create projects? in App Settings, either Project Admins & Global Admins or All users.
- Once a project exists, its Project Admins run it: they add boards, appoint co-admins, and decide who can create boards in each of their projects.
- Global Admins can administer every project; Project Admins administer the projects they own or co-admin.
Project Settings
- Open the project and select Project Settings.
- Manage the project's boards, its members, and its co-admins.
- Add people to the boards they need. Board membership is what controls who can see and work on a board's tasks.
Board Settings
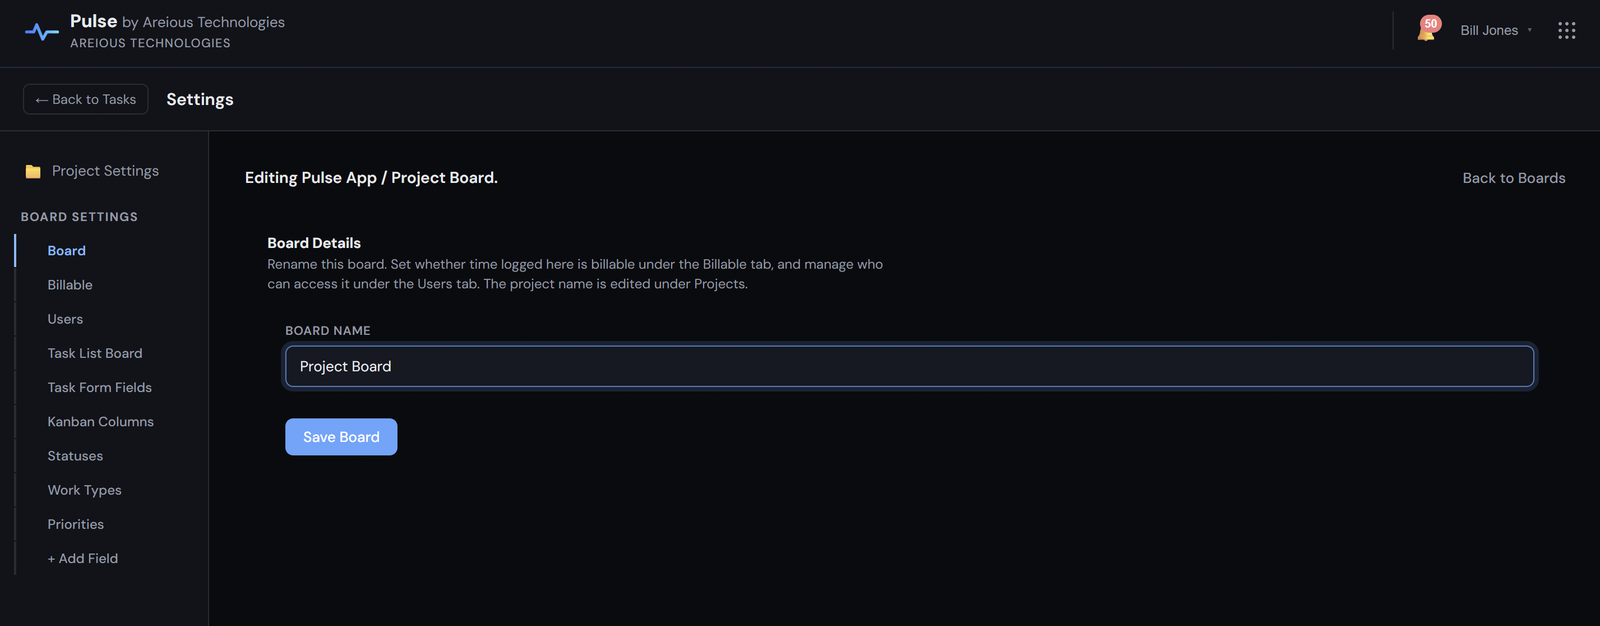
From the workspace, select Manage, choose a board, and open its settings to tailor how that board looks and behaves. Each board is configured on its own. The settings menu contains:
- Board: the board's name and core details.
- Billable: whether time logged on this board is billable, and the rate it bills at. See Billable Rates & Currency.
- Users: who is a member of this board (add individually or via CSV).
- Task List Board: which columns appear in the list view.
- Task Form Fields: which fields appear on the task form, and in what order.
- Kanban Columns: the order the status columns appear on the Kanban Board.
- Statuses, Work Types, Priorities: the dropdown options tasks can use.
- + Add Field: create your own Custom Fields.
Each of these has its own section in the navigation. Select one to configure it. After larger changes, create a test task to confirm the form still reads clearly for someone entering their first task.
Task List Columns
- Open Board Settings, then select Task List Board.
- Read each checkbox as a column choice for this board. Checked columns show; unchecked columns are hidden.
- Keep columns checked when most users need that information for scanning work: assignment, priority, dates, work type, or custom field values.
- Uncheck columns that crowd the board or that your team does not use yet.
- Select Save Columns and wait for the confirmation before leaving.
- Use Show All to re-check every optional column, then Save Columns if that should become the shared setup.
- Title, Sub-tasks, Status, and Actions are required columns and stay visible even when every optional column is hidden.
Board columns are the shared default. Individual users can still personalize their own My View without changing the board.
Task Form Fields
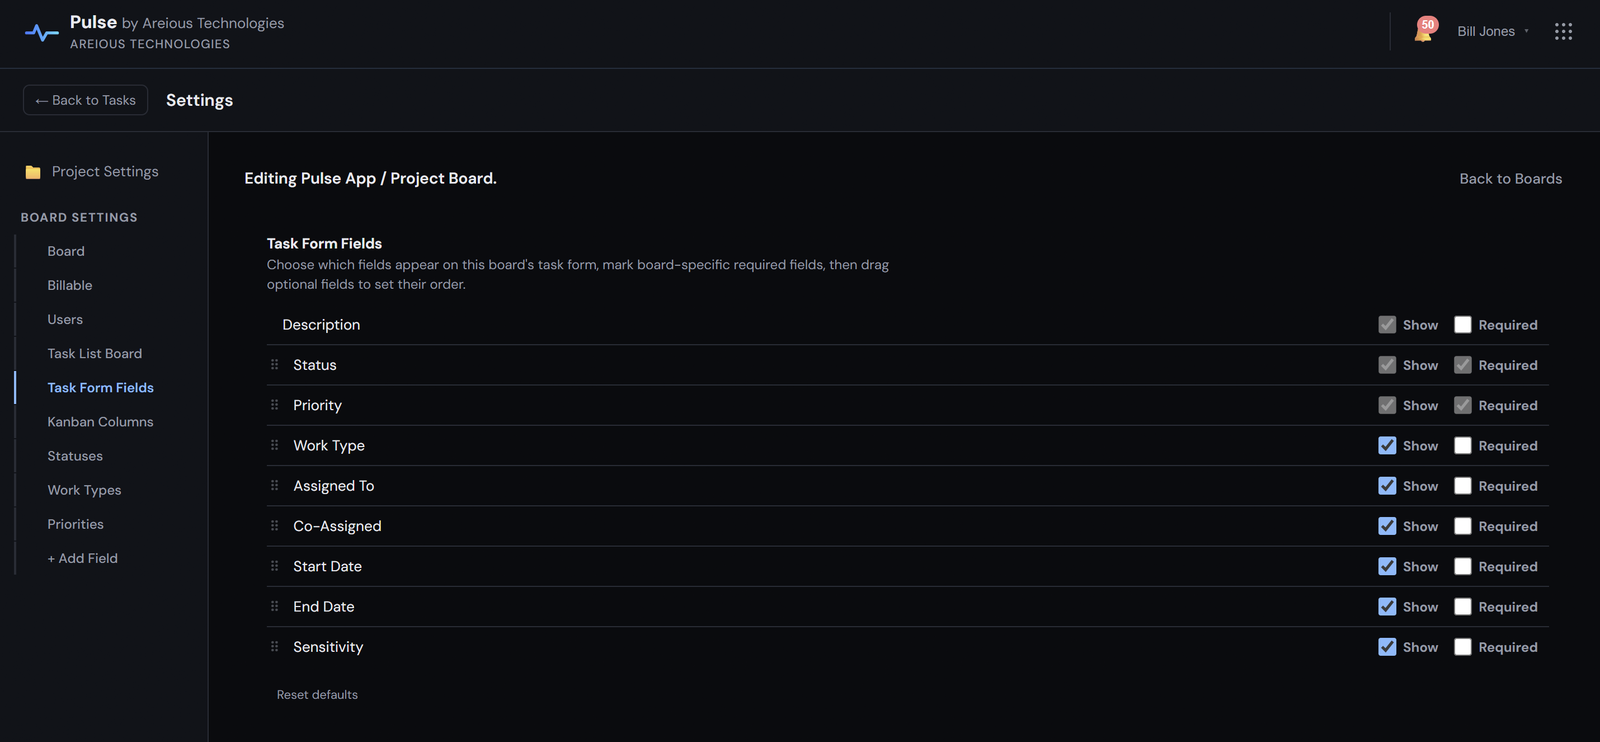
Task Form Fields controls which fields appear on this board's task form, whether each one is required, and the order they appear in.
- Open Board Settings, then select Task Form Fields.
- Review the field list top to bottom. This is the order users see on the task form.
- Use the Show checkbox to show or hide a field on the form.
- Use the Required checkbox to make a field mandatory, so a task can't be saved until it is filled in. This is set per board.
- Drag a field by its handle to move the most important fields higher in the form.
- Put fields users must understand early near the top, and place less-used tracking fields lower.
- Select Reset defaults only when you want to restore the original visibility, required flags, and order.
A few fields are locked so every task keeps its essentials: Title, Description, Status, and Priority are always shown, and Title, Status, and Priority are always required, so those boxes can't be turned off.
Kanban Column Order
- Open Board Settings, then select Kanban Columns.
- Each row is a status that becomes a Kanban column.
- Drag the first workflow status to the top, such as New, Not Started, or Backlog.
- Place active-work statuses in the middle, such as In Progress, Waiting, or Review.
- Place completion statuses at the bottom, such as Complete, Done, or Closed.
- Open the Kanban Board afterward; it should read left to right in the order you arranged here.
- If a status you need is not listed, add it under Statuses first, then return here and drag it into position.
Statuses, Work Types & Priorities
Statuses, Work Types, and Priorities are the built-in dropdown options every task can use. Each is managed the same way, in its own section of Board Settings.
- Select the section you want to update: Statuses, Work Types, or Priorities.
- Scroll to the add row at the bottom of that section.
- Type the option exactly as users should see it in dropdowns and filters. Use short names like "Client Review" rather than long explanations.
- For Statuses and Priorities, choose a badge color so users can scan the list and Kanban Board quickly.
- Select Add. The new row appears and the name field clears.
- If order matters, drag the new row into place.
- Select Edit on a row to change its label or color, then save.
- Drag rows by the handle so dropdowns and board columns follow a useful order.
- Select Delete only when an option should no longer be available for new tasks. Existing tasks keep the value they already have.
- After deleting or renaming common values, open the Task List and use filters to confirm the remaining choices still make sense.
Custom Fields
Custom Fields are your own dropdown fields for grouping tasks by whatever your company tracks: department, product, location, phase, client, project, market, and so on. You can create as many as you need; there is no fixed limit.
- Open Board Settings, then select + Add Field at the bottom of the menu.
- In Field Label, enter the plain-language name users should see, such as Department, Product, or Client. This name appears on the task form, in filters, and as a column option.
- Save the field. It now appears in the settings menu alongside Statuses, Work Types, and Priorities.
- Add the dropdown values that belong under the field. For example, a Department field might include Sales, Operations, Finance, and Support.
- Use Edit to clean up value names and Delete to remove a value you no longer want offered.
- Drag values into the order users should see first, usually the most common at the top.
- Repeat + Add Field for each additional field. To retire a field, remove it from the settings menu. Existing tasks keep the values they already have.
Slack & Teams Notifications
Mirror a board’s notifications to a Slack or Microsoft Teams channel, so the people who live in your chat tool see task activity without opening Areious Task. It uses an incoming webhook, a private address your chat tool provides that Areious Task posts to. There is no app to install and no separate sign-in to connect. Slack & Teams notifications are a Beta feature; your feedback helps shape it.
Create the webhook in your chat tool
Slack: add an Incoming Webhook for the channel you want and copy the URL it gives you. It begins with https://hooks.slack.com/.
Microsoft Teams: add an Incoming Webhook to the channel (or a Workflows “post to a channel when a webhook request is received” flow) and copy its URL. It contains webhook.office.com or logic.azure.com. Teams incoming webhooks usually require a paid or organization plan; a free personal Teams plan may not offer them.
Connect it in Areious Task
- Open Board Settings for the board, then choose Slack & Teams.
- Paste the webhook URL. Areious Task recognises whether it is Slack or Teams and shows a small badge to confirm.
- Select which events to post (see below), then turn on Post notifications to a channel.
- Choose Send test message to confirm the channel receives it, then Save.
What gets posted
One message per event goes to the shared channel (not one per person), for the events you enable:
- Task assignments, when people are assigned or co-assigned to a task.
- Mentions, when someone is @mentioned in a task note.
- Due-date reminders, when a task reminder fires.
- Recurring tasks, when a new occurrence is generated.
- Unblocked tasks, when a task’s last blocker is completed.
Each message names the task and links back to it in Areious Task. This is set per board, so different boards can post to different channels, or to none.
Good to know
- Only a Project Admin or Global Admin can set this up.
- The webhook URL is stored securely and never shown again in full; the panel shows only a masked preview. Paste a new URL to replace it, or choose Disconnect to remove it.
- Posts are sent in the background, so a slow or unreachable channel never delays saving a task. A failed post is retried automatically for a short while.
- This is independent of email notifications and the in-app notification center; connecting a channel does not change either.
Users
Under Settings → Users, manage everyone in the company. Project Admins also use Users to manage the people in their projects.
Manage accounts
- Add a user and set their role: User, Project Admin, or Global Admin.
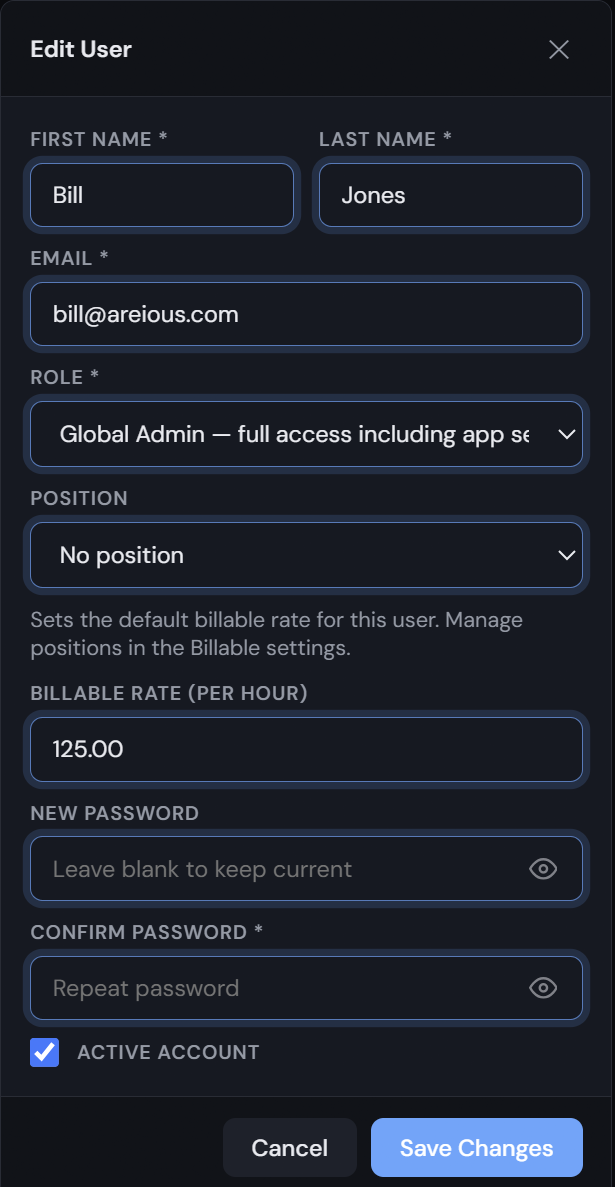
- Edit a person's name, email, password, role, active status, and billable position.
- Deactivate accounts that should no longer have access, keeping at least one active Global Admin.
- Use Export CSV to download the user list.
Reassign tasks between people
- When someone changes roles or leaves, select Reassign Tasks.
- Download the template, list the task reference and the current and new assignee for each row, and upload it.
- Areious Task moves the assignments and reports any rows it skipped.
Import Users
The fastest way to onboard a team is a one-time CSV import. Each person is created as a standard User and emailed a temporary password to sign in with.
- Configure email first. Because every imported user is emailed a temporary password, the import is blocked until SMTP is set up in App Settings.
- Under Users, select Import CSV, then Download template to start from a correct file.
- Include a header row with the columns
first_name,last_name, andemail. Column order does not matter. Areious Task maps by header name. Up to 500 users per import.first_name,last_name,email Ada,Lovelace,ada@example.com Alan,Turing,alan@example.com - Choose your file, check the preview, and select Import Users.
- Review the result. Areious Task reports how many accounts were created and lists any skipped rows with a reason, such as a duplicate or invalid email.
Imported users are created as Users and must set a new password on first sign-in. To grant Project Admin or Global Admin access, edit the account after importing, then add people to the boards they need.
Import Tasks
Import Tasks brings existing work into Areious Task from a CSV file, one board at a time. Because each board has its own statuses, priorities, and custom fields, the importer is scoped to a single board so the values in your file are validated against that board's real options. Import Tasks is a Beta feature.
Before you start
- You need a Global Admin account.
- A project and board must already exist. If you don't have one yet, Areious Task guides you to create a project and board first. A board always lives inside a project.
- Set up the destination board's Statuses, Work Types, and Priorities and any Custom Fields before importing, so your rows map cleanly.
Import
- Under Settings → Import Tasks.
- Choose the project, then the board to import into. Use Refresh if you have just changed that board's options and want the latest.
- Select Download CSV template. The template is built for the chosen board and includes columns for the standard fields (such as
title,status,priority,assignee_email, andcoassignee_email), plus a column for each of that board's custom fields. - Fill in one row per task. The on-screen legend lists the exact status, priority, and option values this board accepts; match them so rows are not rejected. Assignees are matched by email and must be members of the board.
- Choose the date format that matches how dates are written in your file.
- Choose your CSV file. Areious Task shows a preview and validates every row.
- If some rows have problems, use Download errors (CSV) to get a file listing exactly what to fix, correct them, and re-import.
- Select Import Tasks to create the valid tasks on the board.
Billable Rates & Currency
Areious Task can value tracked time in money. Billing is enabled per board, so internal boards can leave it off. Their time is always recorded at zero cost.
Positions and rates
- Under Settings, open the Billable section.
- Define billable positions (for example Software Engineer or Project Manager) and give each one an hourly rate.
- Assign a position to any user in Users who needs a billable rate tied to a specific position. Their billable time is then valued at that position's rate.
- Optionally give an individual a personal rate in their user profile. It overrides their position's rate, for the person whose rate differs from their title's default.
- Set a default rate for time that has no more specific rate, and set the currency symbol shown throughout Areious Task.
How a rate is chosen
When time is logged on a billing-enabled board, Areious Task applies the most specific rate that is set and falls through to the next when one is blank: a rate set on the task itself is checked first, then the board's rate, then the person's own personal rate, then their position's rate, and finally the company default. On boards with billing turned off, time is always non-billable and valued at zero.
Task Retention & Recycle Bin
Areious Task keeps deleted and completed work recoverable rather than losing it instantly. Two separate places handle this: Task Retention for automatically aging out completed work, and the Recycle Bin for things people delete.
Task Retention
- Under Settings → Task Retention.
- Set how many days completed tasks remain before they are archived.
- Set how many days archived tasks remain before they are permanently deleted.
- Review the Archived Completed Tasks list and the groups Pending Permanent Delete.
- Use Delete Selected or Delete All only after confirming the archived tasks are no longer needed.
If Task Retention is left blank, completed tasks are never aged out. They stay on the board.
Recycle Bin
- Open Recycle Bin from the user menu.
- It holds deleted tasks, boards, projects, and users, each in its own section. Use the search box to find an item.
- Select an item to restore it, bringing it back where it was.
- Use a section's select-all and Delete Selected to remove items permanently once you are sure they are no longer needed.
License
The License screen shows the details of your self-hosted Areious Task license. Review it under Settings → App Details → License. There is nothing to enter here; the license is provided as a key file with your install.
What it shows
- Status: Active when the license is valid for this install, or a warning if it is not.
- Customer: the organization the license was issued to.
- Licensed domain and The host: the domain the license covers and the host this copy is actually running on.
- Plan and Users: the licensed plan; user count is Unlimited.
- Issued and Maintenance through: when the license was issued and the date through which updates are included. A note beneath the table shows how many days of updates remain, or how long ago maintenance ended.
- Installed version and This release dated: the version you are running and its release date.
- Key ID: the identifier of the license key, useful when contacting support.
Renewal and reinstatement
Each Areious Task license includes twelve months of updates. To keep receiving them, renew before or on your Maintenance Through date. If the license expires, your installation keeps working on the version you are already licensed for, but you receive no new versions or updates until it is renewed.
An expired license can be reinstated at any time by purchasing the current annual license and paying a flat $550 License Reinstatement Fee. This fee is the same no matter how long the license has been expired; there are no accumulated or back-dated renewal charges.
Reinstating restores your access to current releases, but it does not guarantee that a long-outdated installation can upgrade straight to the newest version. Depending on its age, an upgrade may need intermediate releases, database migration, or other remediation, which Areious can provide as a separate professional service. Always back up your installation, configuration, database, and uploaded files before upgrading.
Create & Edit Tasks
Create a task
- On the board where the work belongs, select Add Task.
- Choose Feature when the work stands on its own, or Sub-task when it belongs under an existing feature, then pick the parent.
- Enter a short, clear title, and a description when the person doing the work needs context, instructions, or a definition of done.
- Set the status, priority, work type, any custom fields, start and end dates, and sensitivity.
- Use Assigned To for the main owner and Co-Assigned when other people need to help.
- Select Save Task and confirm it appears on the board.
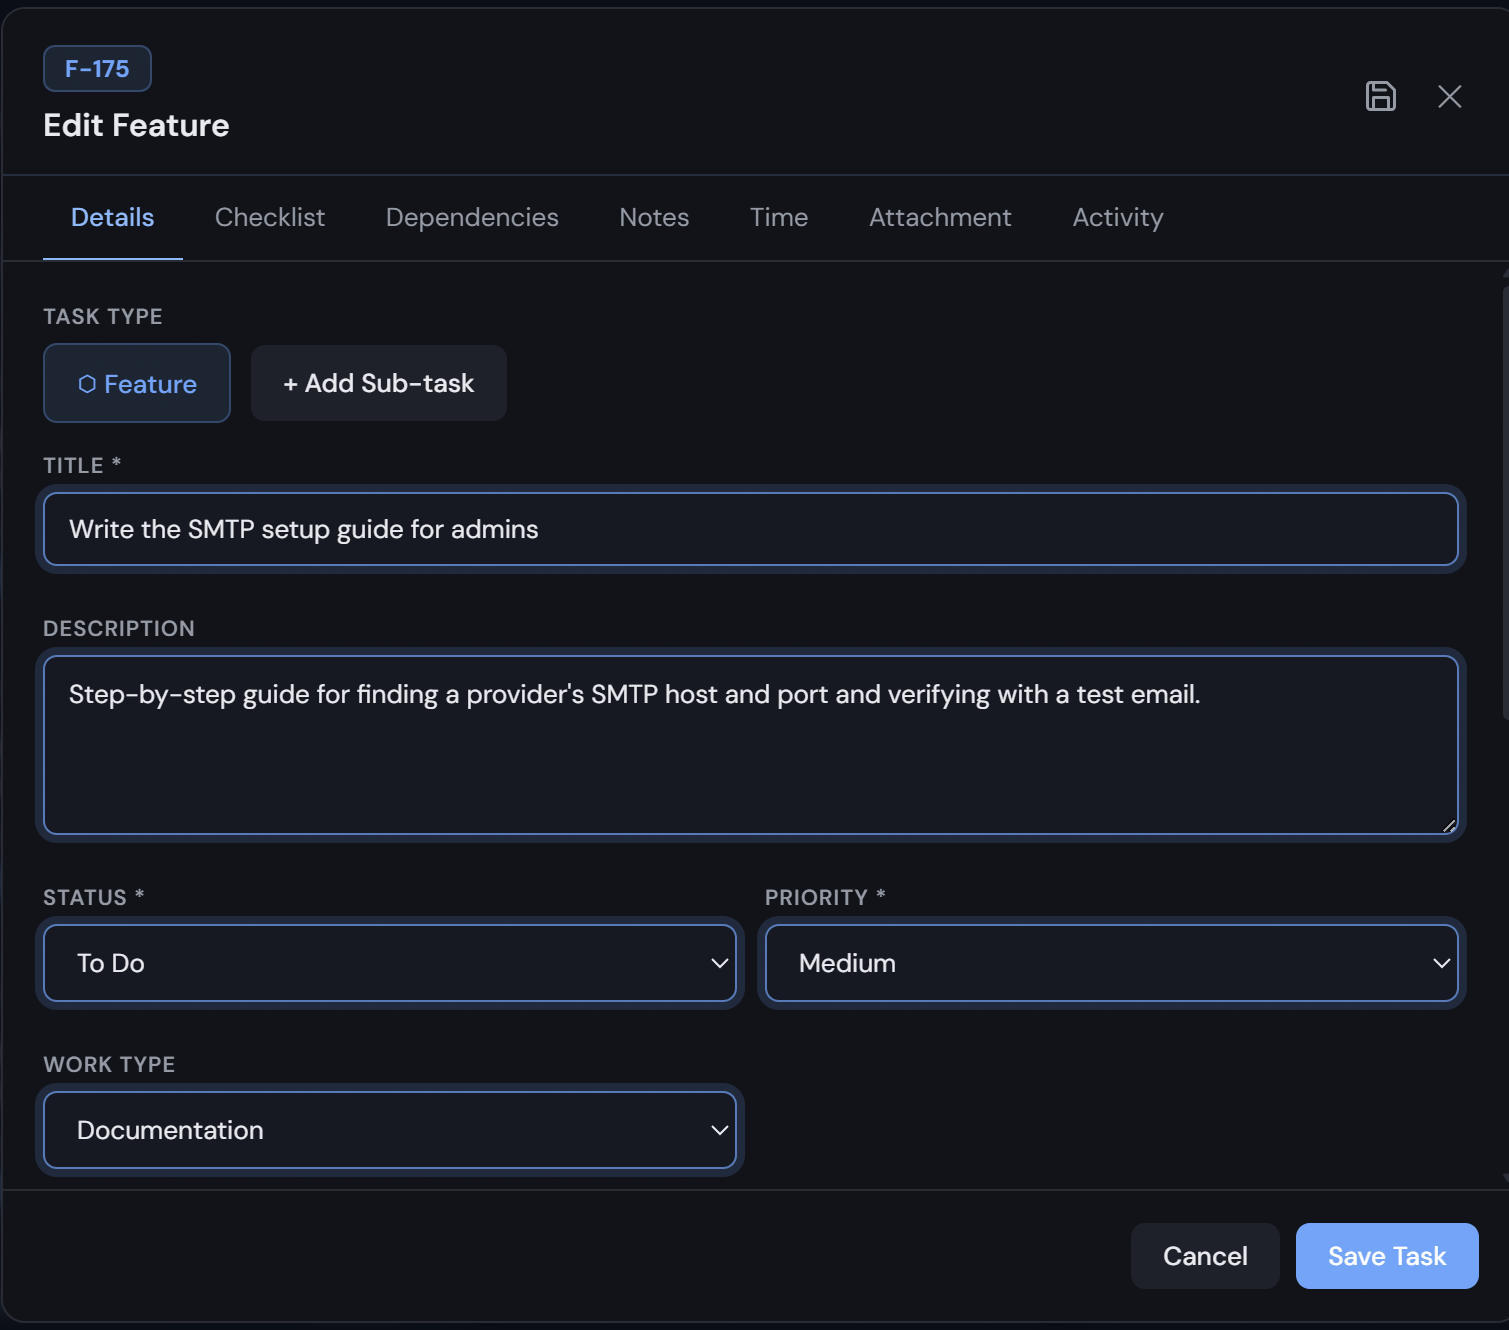
Edit a task
- Open the task from Dashboard, Task List, Kanban Board, Timeline, or a saved view.
- Update any field as the work changes: status to move it through the workflow, priority and dates to keep urgency and timing accurate.
- Change Assigned To or Co-Assigned when responsibility shifts.
- Select Save Task.
Who can edit: a User can edit tasks they created or are assigned or co-assigned to. Project Admins and Global Admins can edit any task on the boards they administer. If Areious Task shows you cannot edit a task, ask a Project Admin or Global Admin.
Notes, Attachments & Activity
Anyone who can view a task can add their own notes and attachments and follow its history, even when they cannot edit the task record itself.
- Open a task and select the Notes tab.
- Write the note in plain language so another team member understands what happened and what is next. Notes support rich text, including tables.
- Type @ and a name to mention a teammate. Mentioned people get an in-app and email notification pointing back to the task.
- Select Add Note and confirm it appears in the list.
- Select the Attachment tab.
- Choose the file that belongs with the task. Areious Task accepts common PDF, Office, text, CSV, and image files up to 10 MB.
- Wait for the upload to finish before closing the task.
- Return to the tab later to download or review files connected to the task.
- Select the Activity tab to see what changed on the task and when.
- Check the activity history before asking for a status update. The answer may already be there.
- Add a note if you still need to ask a question or capture a follow-up.
Links
The Links tab keeps references to files and resources that live outside Areious Task next to the task they belong to, documents in SharePoint or OneDrive, files on a shared network drive, or any web page. It is also the place for anything larger than the 10 MB attachment limit.
- Open a task and select the Links tab.
- Choose a type (see below), paste the address or path, and optionally add a title and a short description.
- Select Add link. Anyone who can view the task can open it; the person who added a link can remove it.
- Link, any web address (
https://…) for a page or resource. - Link to Documents, a web document such as a SharePoint or OneDrive file. Ideal for documents over 10 MB that are too large to attach.
- Shared Drive, a network path such as
\\server\share\file.docx(or afile://address). Because browsers can't open a network path directly, these show a Copy path button so you can paste the path into File Explorer. Local drive paths (for exampleC:\…) aren't accepted, since they only work on one person's own computer.
An attachment uploads a copy of a file into Areious Task (up to 10 MB). A link only points at a file kept somewhere else, so there is no size limit and the original stays where your team already manages it. For large files, or files you want to keep in SharePoint, OneDrive, or a shared drive, add a link instead of an attachment.
Checklists
A checklist breaks a task into small, tickable steps. Checklists are collaborative. Anyone who can view the task can check items off, so a whole team can share one list.
- Open a task and select the Checklist tab.
- Add an item for each step of the work.
- Check an item off as it is completed; the progress is visible to everyone on the task.
- Drag items by the handle to reorder them, and delete items that no longer apply.
Dependencies
Dependencies record when one task must wait for another. A task that is waiting on an unfinished task is blocked, and shows a 🔒 badge until the tasks blocking it are complete.
- Open a task and select the Dependencies tab.
- Add the tasks this one is blocked by, its predecessors. Until they are complete, this task shows as blocked.
- Areious Task prevents circular dependencies (two tasks that block each other), so if a link is refused, check that it does not loop back.
- Remove a dependency with the ✕ control when it no longer applies.
When every blocker is complete, the lock clears and the task is free to move forward.
Dependencies can span boards. A task on one board can be blocked by a task on another. This is useful when a larger piece of work is split across several boards, so a task on one board can wait on a task being handled by a different team or in a different project. The link is recorded on both tasks, so each task's Dependencies tab shows the relationship, and the blocked task keeps its 🔒 badge until every blocker is complete, wherever those blockers live. Moving a task to another board (including a bulk Move) keeps its dependencies intact. One thing to keep in mind: a person who can see one board but not the other will see that a task is blocked without being able to open the blocking task, so where a cross-board dependency matters, make sure it is clear to the people working on both boards.
Time Tracking
Areious Task tracks time against tasks with live timers or manual entries, and compares it to your estimate. On billing-enabled boards, time is also valued using your rates.
- Open a task and select the Time tab.
- Start a timer to track live. Starting a timer automatically stops any other timer you have running, so you are only ever tracking one task at a time.
- Stop the timer when you pause or finish.
- Add a manual entry to record time you did not track live.
- Edit or delete your own entries as needed. Global Admins can adjust anyone's entries.
- Set an estimate for the task so effort can be compared against it.
- The Time tab shows logged time and per-person totals against that estimate.
To report across tasks and people, use Timesheets under Reports.
Board Views
The same work can be viewed five ways. Switch between them in a click and pick the one that answers the question you have.
- Dashboard: a quick summary of current task activity.
- Task List: sortable, filterable rows with columns and export-ready data.
- Kanban Board: tasks grouped into status columns, with drag-and-drop between them.
- Timeline: scheduled work by start and end date, for reviewing timing and risk.
- Calendar: a month grid that draws each task as a bar across its full date range, from its start date to its due date, so you can see what is in progress on any given day. A task with only one date shows on that single day, and tasks with no dates are listed below the grid.
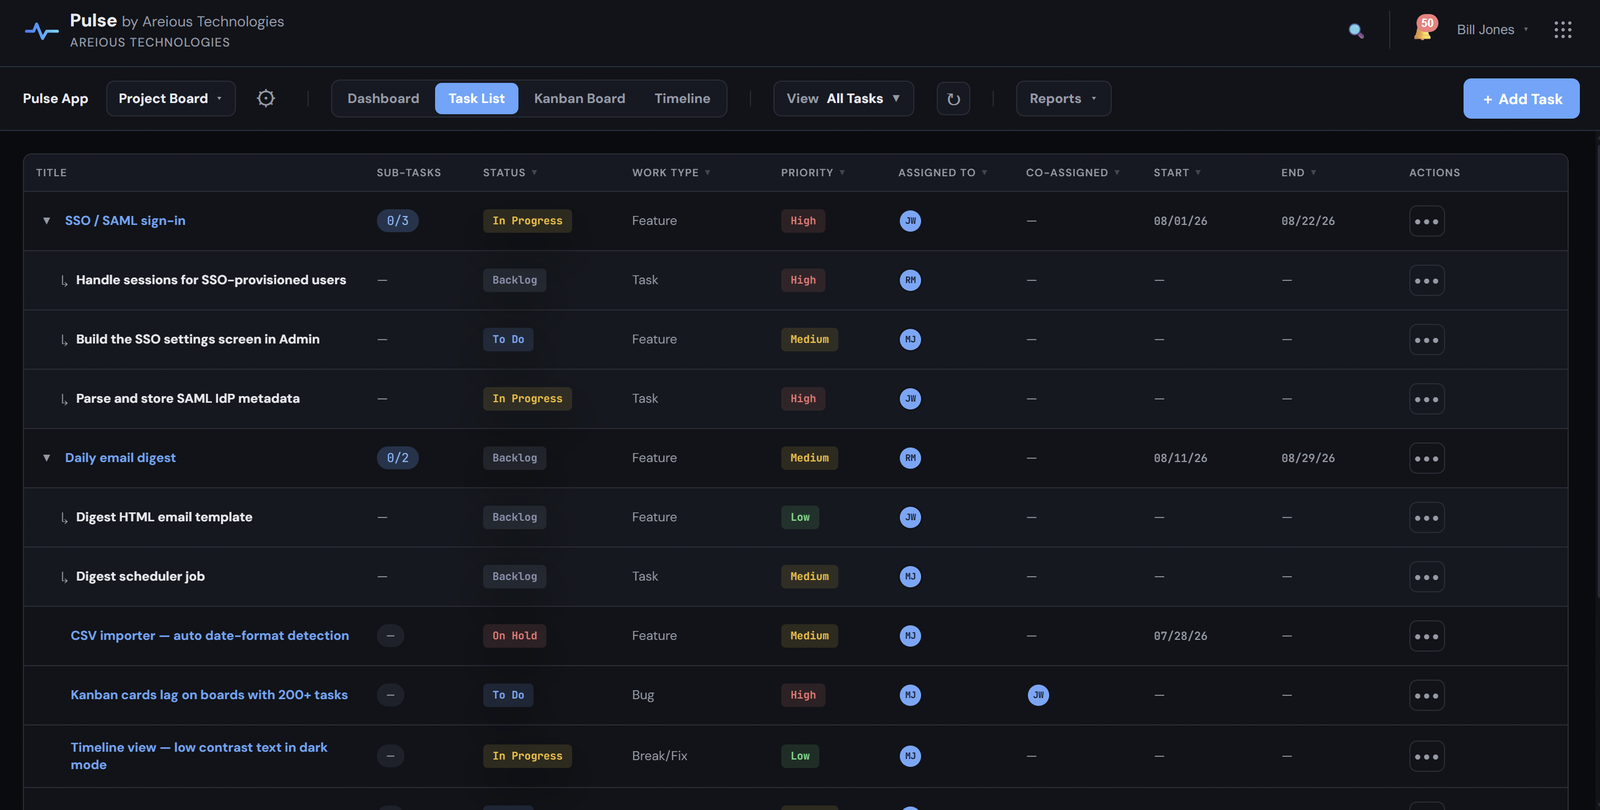
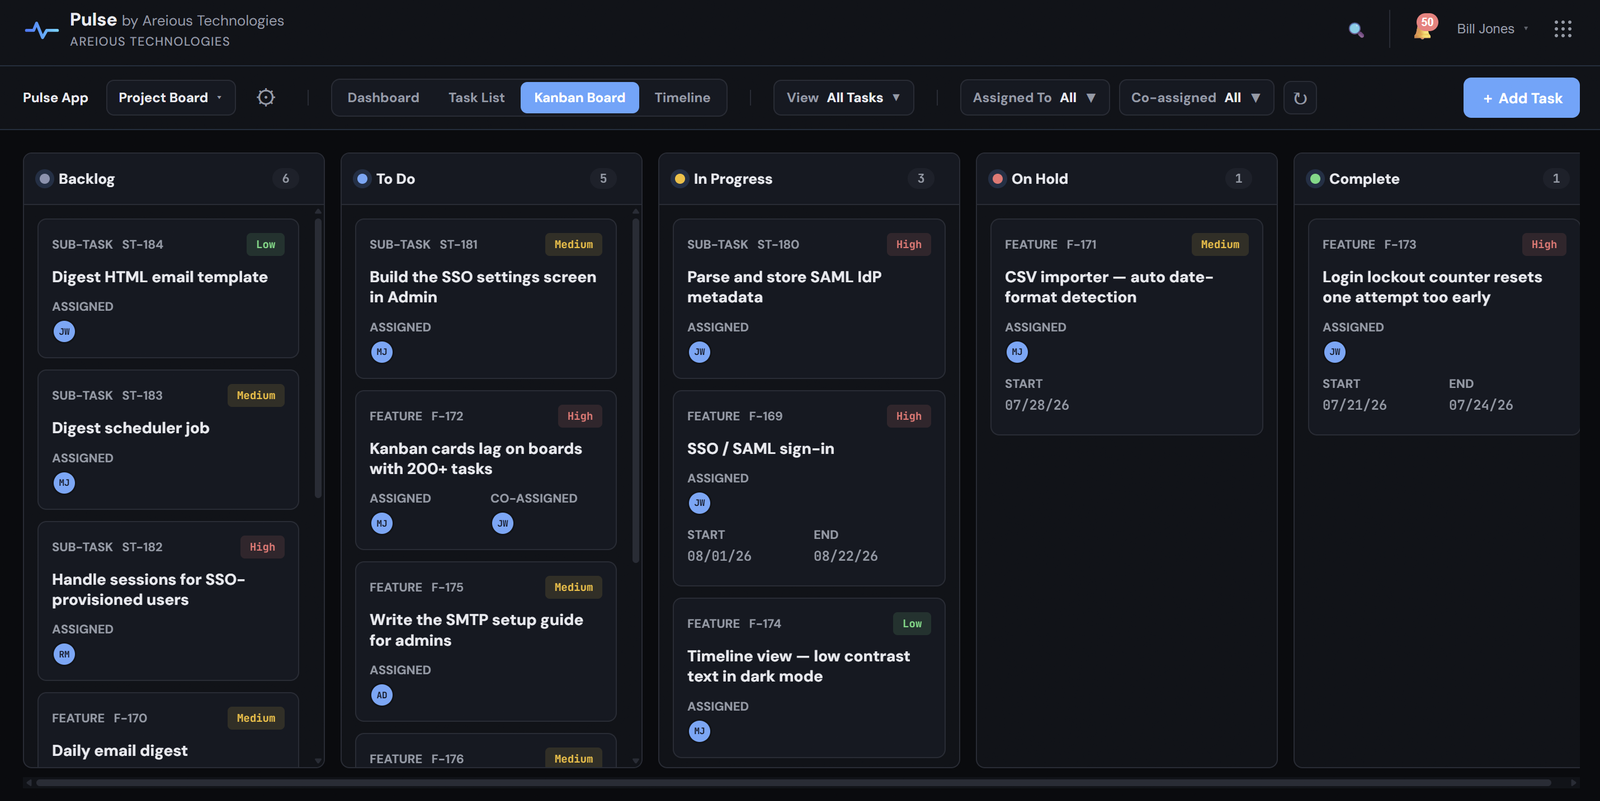
Open any task's row or card to reach its Details, Checklist, Dependencies, Notes, Time, Attachment, and Activity tabs.
Bulk Actions
The Task List lets you act on many tasks at once instead of opening them one by one. Each row has a checkbox in the first column, and the checkbox in the header selects or clears every row currently in view (so it respects any filter or search you have applied).
- Switch to the Task List view and tick the tasks you want. Click one checkbox, then Shift-click another to select the whole range between them.
- An action bar appears along the bottom showing how many tasks are selected, with buttons for each action. Clear deselects everything.
- Choose an action, confirm in the dialog, and Areious Task applies it to the whole selection at once.
The available actions are:
- Assign: set who is Assigned or Co-assigned on the selected tasks. Choose Add to existing (the default, which keeps the current assignees and adds the ones you pick) or Replace (which sets the role to exactly the assignees you pick; picking nobody clears it). Assignees who are not members of a task's board are skipped for that task.
- Status: move every selected task to the status you choose. Setting them to the board's final status marks them complete, just like changing status one task at a time.
- Due date: set a due date on all selected tasks, or leave it empty and apply to clear the due date.
- Move: move the selected tasks to another board you have access to. Sub-tasks always move with their parent feature, and dependencies are kept (see Dependencies for how links can span boards).
- Delete: move the selected tasks to the Recycle Bin. A deleted feature takes its sub-tasks with it, and everything can be restored from the Recycle Bin.
Bulk actions follow the same permissions as editing a task on its own: any task you are not allowed to change is skipped and left untouched. After each action Areious Task tells you how many tasks were changed and how many were skipped.
Search, Filters & Saved Views
A view is a saved arrangement of the Task List that you can return to in one click. You create the view first, then apply the filters you want and save them into it. Everyone works from the same boards, but each person keeps their own set of saved views.
Use Search for a task title, keyword, client, project, or any detail you need to find fast. To focus on the tasks that are yours, open the View dropdown and tick My View — a quick toggle that limits the board to tasks assigned or co-assigned to you, separate from your saved views.
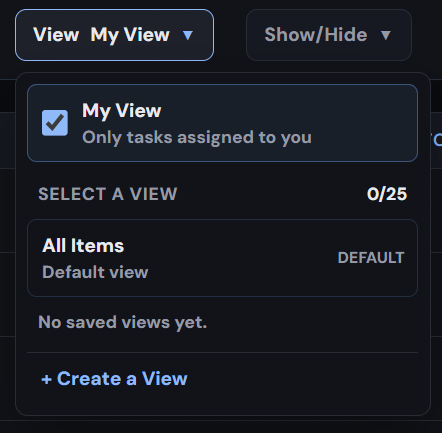
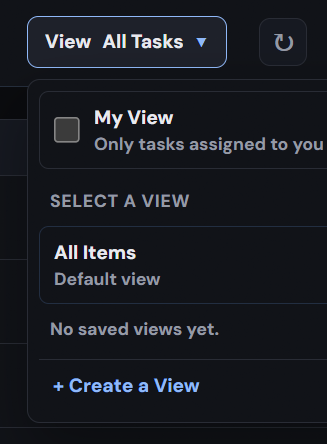
In this example we will build a view of the tasks assigned to Angela. You can keep up to 25 saved views; the counter next to Select a View shows how many you have used.
Step 1 — Select Create a View. Open the View dropdown and select + Create a View at the bottom.
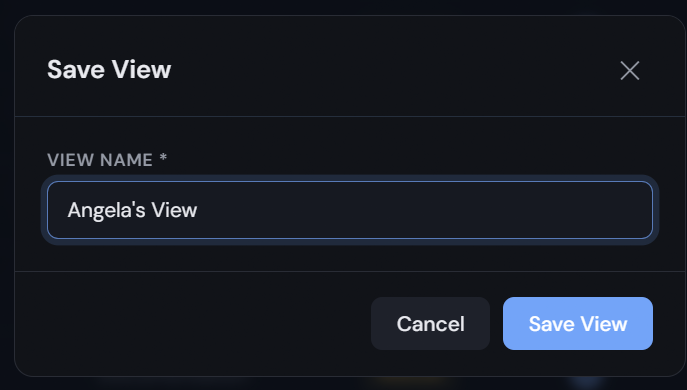
Step 2 — Name your view and save. In the Save View window, type a clear View Name you will recognize later, then select Save View. The new view is now added to your list, ready for you to fill with filters.
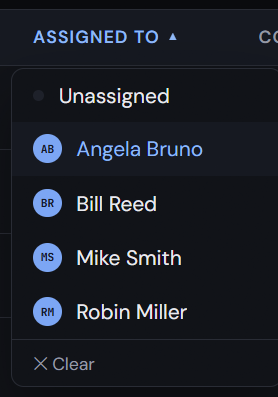
Step 3 — Filter by your field choices. With the view open, narrow the list using column filters in the Task List (or people filters on the Kanban Board) — status, priority, work type, assignment, co-assignment, custom fields, or other visible values. Here we use the Assigned To field and choose Angela. Each filter menu has a Clear option to remove it again.
Step 4 — Click Update to save your filters. Open the View dropdown again and select Update next to your view. This saves the current filters into the view so it opens the same way every time.
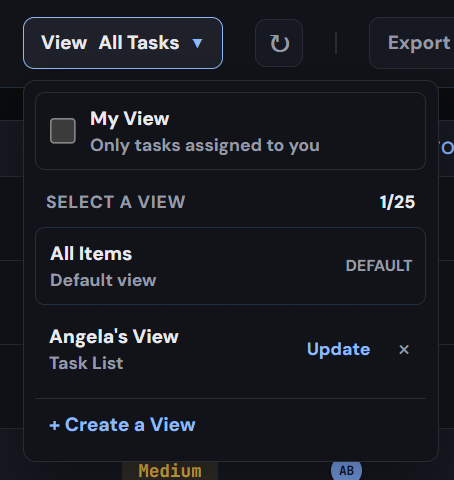
Step 5 — Open your view any time. Select the view from the View dropdown to load it with its saved filters. All Items is the built-in default view and returns you to the full list, including completed tasks; it cannot be changed or deleted.
Use Export to download the currently visible, filtered task page as a spreadsheet-friendly CSV. Check the visible page first so the file contains exactly the tasks you intend.
Live Updates & Presence
Areious Task keeps what you are looking at current while other people work at the same time, so you are not acting on a stale screen. It does this by quietly checking for changes in the background, with nothing to install and no setup.
While you have a board open (Task List or Kanban), it checks for changes every few seconds and brings in other people's new, edited, moved, and completed tasks automatically. You do not need to refresh. If a change arrives while you are in the middle of something (a task open, a card being dragged, tasks selected, or a filter menu open), the board waits and shows a small New changes on this board · Refresh button at the bottom instead, so your work is never interrupted. Select it, or simply finish what you are doing, and the board catches up.
When you open a task, the header shows a small circle with the initials of anyone else viewing that same task right now. This tells you at a glance when a colleague is already in the task, so two people don't unknowingly work on it at once. The circles clear on their own shortly after someone closes the task or steps away.

If another person saves a change to a task while you have it open (an edited field, a new note, a checklist item, or an attachment), a notice appears just under the task header: This task was updated by someone else, with a Reload button. Your open task is never overwritten while you read or type. Select Reload when you are ready to pull in the latest version.

- Updates pause while a tab is in the background and resume the moment you return to it, so it stays light on your device and network.
- These updates cover the board grid and who is viewing a task. They do not live-type another person's edits into a task you have open; you stay in control and choose when to reload.
Reports Overview
Reports give you cross-board views and exports. Access is per report: company-wide reports (Activity Log, Board Access) are Global-Admin only, while Timesheets is available to the people who can access a given board. Every report can be exported to CSV.
Areious Task groups reporting in two places:
- The Reports section of Settings holds the company-wide reports below: Activity Log, Board Access, and Timesheets.
- The user menu holds the two personal reports every user has: My Work Report and their own Timesheets. See Your Account.
Open My Work Report from the user menu for a personal, cross-board list of every task where you are assigned or co-assigned: what is on your plate, wherever it lives. One row per task, with the board's columns and any custom fields. Export it to CSV for your own records.
From a board view, export the Notes, Checklist, or Dependencies across the tasks currently in view as CSV. These follow the board's filters, so narrow the view first to control what is included.
Activity Log
The Activity Log is a Global-Admin view of every task on one or more boards, regardless of who it is assigned to. It shows the same work list as a personal work report, but company-wide rather than limited to your own tasks: a single snapshot of a board's whole workload, one row per task rather than an event-by-event trail.
Using it
- Under Settings → Reports → Activity Log.
- Use the Board picker to choose one or more boards. The list refreshes as you change the selection; the first board is selected for you to start.
- Read the results in the table below. Each row is a task with its board columns and any custom fields.
- Use the table's own column filters to narrow by status, assignee, or any other column. There is no separate person or date filter here because the columns already cover it.
- Select Export CSV to download the current selection as
board-activity-log.csv.
Board Access
Board Access is a company-wide report of who can reach which boards, available to Global Admins. Use it to review membership across every project in one place: for an access audit, an offboarding check, or confirming a new hire can see the right work.
What it shows
A summary line reports how many access records span how many users and boards, above a table with one row per user-and-board pairing:
- User and Email: who has access.
- Access: how they reach it: Global Admin, Project Admin, or User.
- Status: the user's account status.
- Project and Board: what they can reach.
Select Export CSV to download the full report for record-keeping or review outside Areious Task.
Timesheets
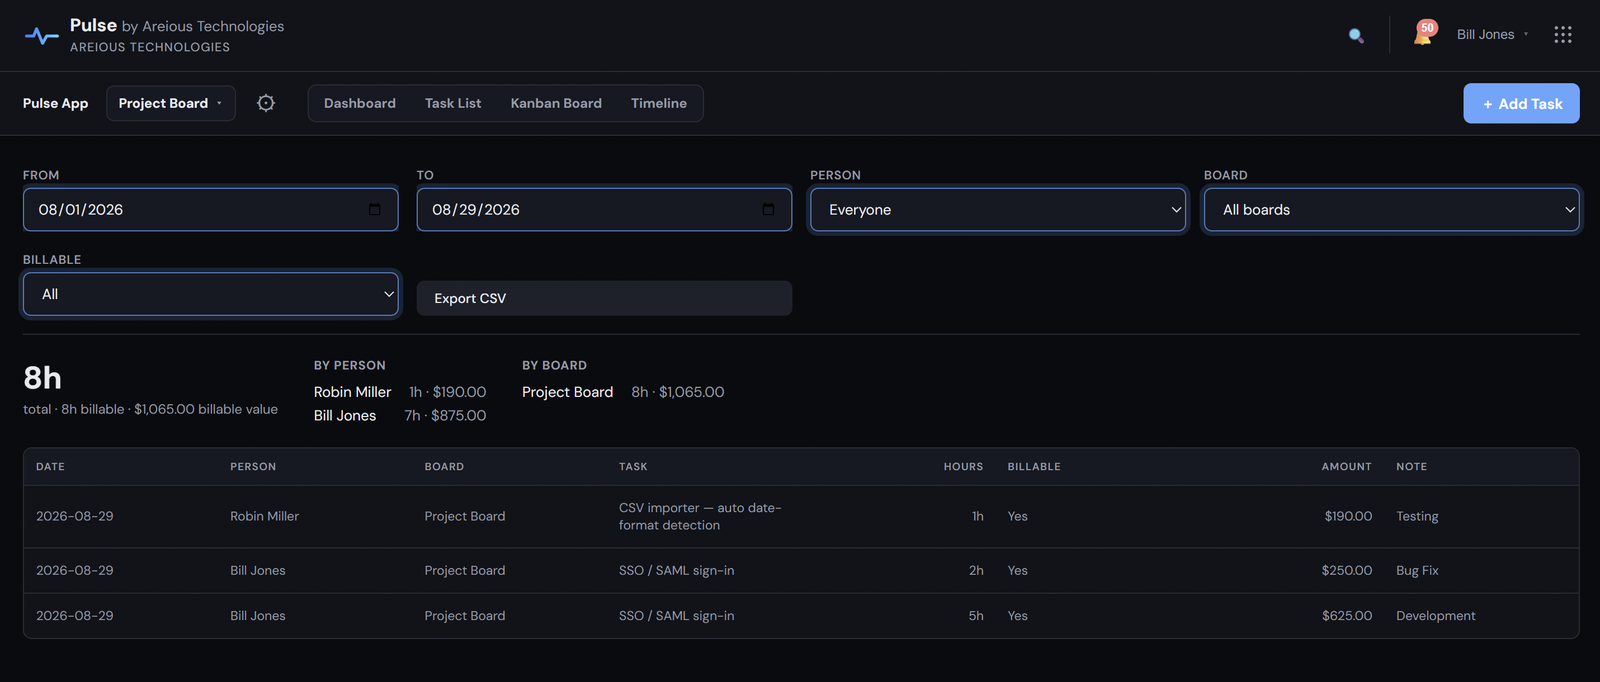
Tracked time rolled up across tasks. Filter by date range, board, and whether time is billable, then use Export CSV for payroll, invoicing, or analysis.
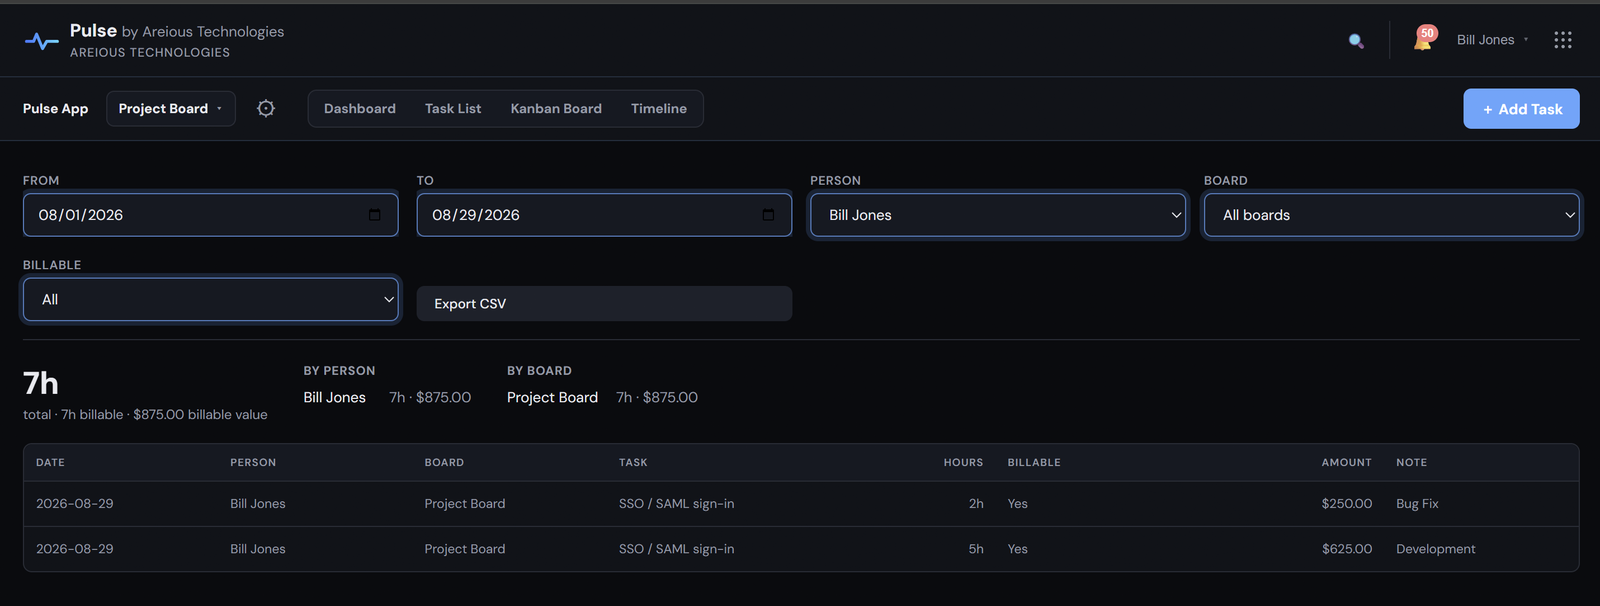
An admin's Timesheet report shows every user's time, and can be filtered to a single person with the Person filter.
Everyone can open their own Timesheets from the user menu, which shows only their own tracked time.
Signing In
Everyone reaches Areious Task from the same login screen with their email and password. It also handles creating an account, resetting a forgotten password, the first sign-in for imported users, and inactivity session timeouts.
Account & Password
Open Account Information from the user menu to update your profile (name, email, timezone) and change your password.
Two-Factor Authentication
Two-factor authentication adds a second step at sign-in, by authenticator app or emailed code. Setup, recovery codes, requiring it for everyone, and lockout recovery work the same across Areious products.
Sign-in speed and your host's PHP setup
When two-factor authentication uses emailed codes, each sign-in emails a one-time code, and sending that email over SMTP is the slow part of the request. How quick sign-in feels depends on how your host runs PHP. (An authenticator app sends no email, so it isn’t affected by any of this.)
- Most modern hosts feel instant. On hosts that run PHP as LiteSpeed or PHP-FPM, Areious Task returns the sign-in response first and sends the code a moment later, so there is no wait. This happens automatically, with nothing to configure.
- Older setups wait on the email. On a host that runs PHP the older way (Apache mod_php or CGI), the code email is sent before the response, so sign-in waits for it, usually a second or two. Nothing is broken and the code always arrives; the request just isn’t as quick.
- Want it faster? Ask your host, or check the PHP settings in your hosting control panel, whether the site can run under PHP-FPM or LiteSpeed. Switching removes the wait, and it affects only the two-factor sign-in step; everything else is unchanged.
API Tokens
An API token lets a script or another tool use the Areious Task API on a user’s behalf (for reporting, integrations, or automation) without sharing a password. A token acts as the user it belongs to, with exactly their permissions, so it is treated like a password. To keep issuance controlled, only a Global Admin can create or revoke tokens; other users get a read-only view of the tokens on their account and can request one.
- Open Account Information from the user menu and switch to the API Tokens tab. Here you can see the tokens already connected to your account (read-only).
- Under Request a token, give it a name you’ll recognise later (for example “Zapier” or “Power BI report”), choose an Access level (Read & write or Read only), optionally add a reason, and select Submit request.
- A Global Admin reviews the request. You’ll see its status (pending, approved, or denied) in the same tab, and you’re notified in the notification center and by email when it’s approved or declined. When it’s approved, a Reveal button appears next to the token: select it, confirm your password, and the token is shown once. Copy it straight into your integration; it will not be shown again.
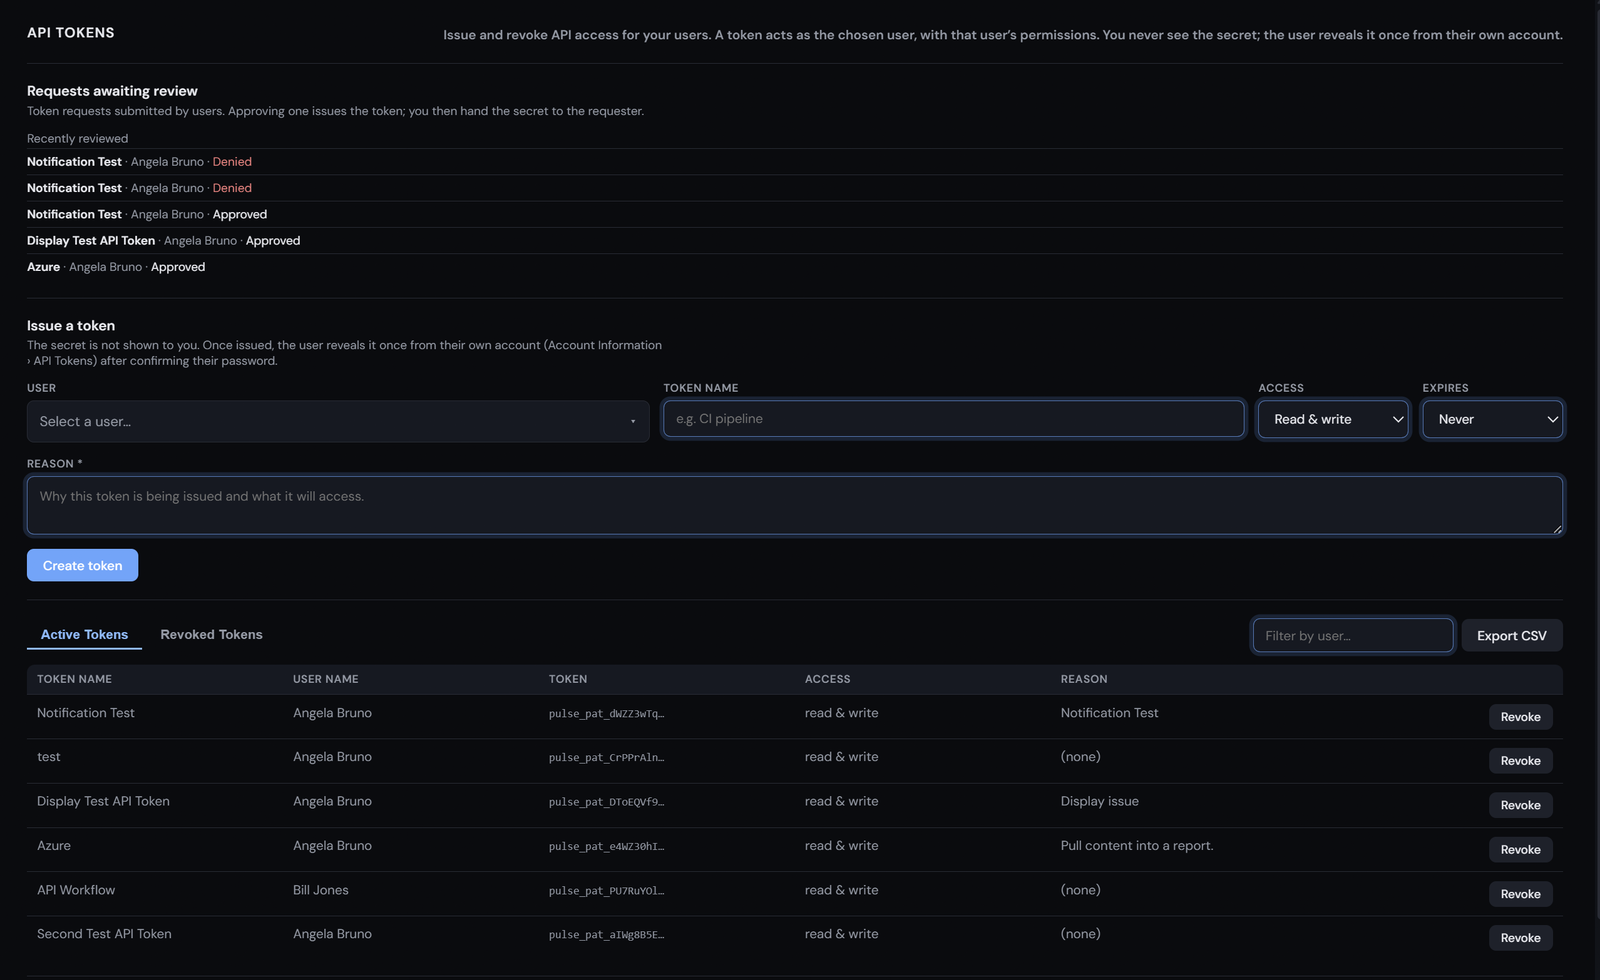
Global Admins manage tokens under Admin → API Tokens, and are notified in the notification center and by email whenever a user requests one. For security, the admin never sees the secret; each token is revealed once by its own user, from their account, after they confirm their password.
- Issue a token for any user directly: pick the user (the list is searchable by name or email, so people with the same name stay easy to tell apart), give it a name, an access level, a reason (recorded for the audit trail), and an optional expiry (Never, 30 days, 90 days, or 1 year), then Create token. The user then reveals it from their own account. Tokens awaiting a first reveal are marked awaiting user reveal in the list.
- Review requests in the queue: Approve issues the token (the requester reveals it from their account) or Deny declines it.
- See and revoke every token in the company, with its user, access level, and when it was last used.
If a user loses a token before saving it into their integration, it cannot be shown again; a Global Admin simply issues a replacement and revokes the old one.
Each user can hold up to 20 active tokens at a time.
Send the token in an Authorization: Bearer header on requests to the Areious Task API. For example:
curl -H "Authorization: Bearer task_pat_XXXX" \
  "https://your-task-site/api_tasks.php?resource=tasks&board_id=1"
Tokens work on the task and data endpoints (tasks, time, notes, attachments, activity, saved views, work history, reports, and checklists). Account, user-management, and settings actions are not available to a token; those require an interactive sign-in.
A Read only token can fetch data but is refused on any request that would change something. A Read & write token can create and update, still limited to whatever its user is allowed to do.
A Global Admin selects Revoke next to any token in Admin → API Tokens to turn it off immediately, so any integration using it stops working at once. Revoke tokens that are no longer used, and replace one you think may have leaked (issue a new one, update the integration, then revoke the old one).
Revoked tokens stay listed on the Revoked Tokens tab as an audit trail. To keep that list from growing forever, a Global Admin can set a retention window under the token list: Delete revoked tokens N days after they are revoked (0 keeps them indefinitely). Only revoked tokens are ever removed; active tokens are never affected.
For security, a token is a second credential and bypasses the emailed 2FA code at sign-in by design, so it is guarded like a password. Only its hashed value is stored, so a database leak alone can’t reveal a working token.
Calendar Feed
The calendar feed lets you see your Areious Task tasks that have a due date inside your own calendar app (Microsoft Outlook, Google Calendar, or Apple Calendar), alongside your meetings and everything else. Areious Task gives you a private subscribe link; you paste it into your calendar app once, and from then on your due tasks appear there and keep in sync. The feed is read only: it shows tasks for viewing, and you still create and edit them in Areious Task.
- Only tasks that have a due date (End date) set. A task with no due date never appears.
- Only tasks assigned or co-assigned to you. It is your personal feed, not the whole board.
- Each task appears as an all-day event on its due date (or spanning its Start date to its due date). The event includes the board, status, and priority, and a link back to the task in Areious Task. Completed tasks are shown with a check mark.
- Open Account Information from the user menu and switch to the Calendar tab.
- Select Turn on calendar feed. Your private subscribe URL appears.
- Select the copy button next to the URL to copy it, then paste it into your calendar app (see below).
Keep this link private. It is read-only, so no one can use it to sign in or change anything in Areious Task. It does, however, expose the titles and due dates of your tasks to anyone who has it, so avoid sharing it, and reset the link if it is ever exposed.
- Microsoft Outlook / Microsoft 365: Add calendar → Subscribe from web, paste the link, give it a name (for example “Areious Tasks”), and select Import.
- Google Calendar: under Other calendars, choose From URL, paste the link, and select Add calendar.
- Apple Calendar: File → New Calendar Subscription, paste the link, and select Subscribe.
A subscribed calendar is pulled by your calendar provider on their own schedule, not pushed instantly by Areious Task. When you add a task, change a due date, or complete a task, the change is in the feed straight away, but it will not show in your calendar until your provider next refreshes the subscription.
Microsoft Outlook and Microsoft 365 are the slowest. Microsoft refreshes subscribed internet calendars on its own timetable, commonly several hours, and sometimes up to about a day. There is no reliable “refresh now” button, and Areious Task cannot make Microsoft pull sooner. This is a Microsoft limitation that applies to every internet calendar subscription, not just Areious Task. Because most companies run on Microsoft 365, expect new tasks and edits to appear on a delay rather than immediately.
To force Outlook to pull the latest version right away, remove the Areious Tasks calendar and subscribe again with the same link; subscribing does a fresh fetch. Google Calendar and Apple Calendar generally refresh more often than Outlook, though they too update on their own schedule rather than instantly.
- Reset link generates a brand-new URL and immediately stops the old one from working. Use it if the link may have been shared or seen by someone who should not have it. After resetting, update the link everywhere you subscribed, because the old subscription will stop receiving updates.
- Turn off feed disables the feed entirely; any calendar still subscribed to it will stop updating.
The link carries a long, random secret rather than your password, and it only ever allows reading your own due-dated tasks. If nothing appears after you subscribe, first make sure you have tasks assigned to you with a due date, then remember the refresh delay above, especially on Outlook.
Notifications & Display
Notifications
- The in-app notification center collects updates that involve you: assignments, due dates, @mentions, and comments.
- Clear a single item, or use Mark all read and Clear all to tidy the list.
- Matching email notifications are sent when a Global Admin has configured SMTP. Automated reminders and overdue nudges are sent on a schedule.
Task reminders
A task’s assignees and co-assignees can be reminded about it in two ways. Both send an in-app notification, and both also send an email when a Global Admin has turned on Reminder & Recurring emails and configured SMTP.
Automatic due-date reminders
- Any task with a due date (End date) is reminded automatically, with nothing to set up. Areious Task sends one reminder the morning before the due date (worded “due tomorrow”) and another the morning of (worded “due today”).
- Both go out at 8:00 AM, in the time zone of the person who created the task.
- This is controlled per company by the Due-Date Reminders toggle in App Settings, which is on by default. A Global Admin can turn it off to stop these automatic reminders entirely.
- Reminders are scheduled when a task is created or saved. Turning the feature on does not reach back to existing tasks: a task that already had its due date set starts getting reminders the next time it is edited and saved.
- A reminder is only scheduled while it is still in the future, so setting or moving a due date to a date that has already passed does not fire a late “due today” notice.
Manual reminders
- On any task you can also set a Reminder date and time in the task panel, independent of the due date. Areious Task notifies its assignees and co-assignees at that moment, plus a day-before advance notice when the reminder is more than a day out.
- A manual reminder and the automatic due-date reminders are separate: setting or clearing one never affects the other.
Display
- Areious Task offers a dark mode and a responsive layout that works on phones as well as desktops.
- If the interface looks out of date after an update, do a hard refresh (Ctrl/Cmd + Shift + R).